LED Lighting
LED Lighting has really boomed in the RV Industry. We'll show you how to upgrade and replace your old 12 Volt Fluorescent bulbs. With the right type of LED replacement bulbs installed, you can really reduce the amount of electricity needed for your RV - especially if you boondock!

The actual cover has been removed from the fixture, so you can see what is inside and what needs to be dealt with. I would remove the 2 old energy sucking fluorescent bulbs first. Then you want to remove the 4 screws that are holding the fixture to the ceiling or bottom of your cabinets.
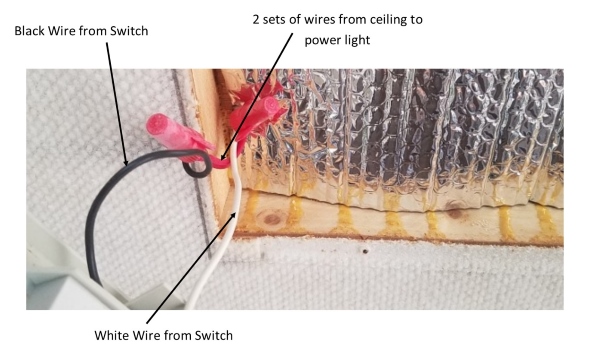
When you remove the 4 screws to the fixture, it will then be lose enough to pull down and away from the ceiling. It will have 2 wires from the fixture that are attached with "wire-nuts" to the 12 Volt DC power wires coming from the ceiling of the RV. The wires from the ceiling will be grouped if it is coming from another fixture as well. Depending on the fixture location, you may have 2 sets of wires coming out of the ceiling, instead of 1 of each. Doesn't matter - you just want to be sure to match up your colors again when you re-install the fixture later.
Before removing the wire nuts and taking the fixture away - note the colors of the wires and look to see if at least one of them is a match? White switch wire to white ceiling wire? or dark to dark? or best, if your not sure - take a quick picture on your phone. Amazing how many times I have referred to a picture I took before removal of something!!
Once you have disconnected the wires of the fixture from the ceiling, lay the old fixture down on a large table or counter area so you have plenty of work space. Again, until you've done your first one, take a picture of it, in the original look of the wires.
LED Lighting Concept of Changing the fixture.
All you will be doing is exchanging the type of light used in this fixture from the old style tube to the new style LED source. Remember that as you look this over. It will still be a 12 Volt DC system you are using - just exchanging the long tubes for cooler, energy efficient LEDs.
As I mentioned above, the power source of the old light is 12 Volts DC. The new fixture when completed will also be 12 Volt DC - and incredibly "neater". Lots of wiring and the ballast aren't needed in the new version.
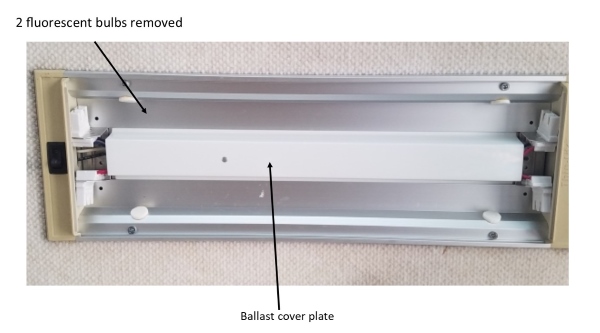
The above picture shows the tubes removed and ready to work on it. The old type "Ballast" cover needs to be removed. It just fits in slots on the fixture. Just squeeze it and it will come right out.
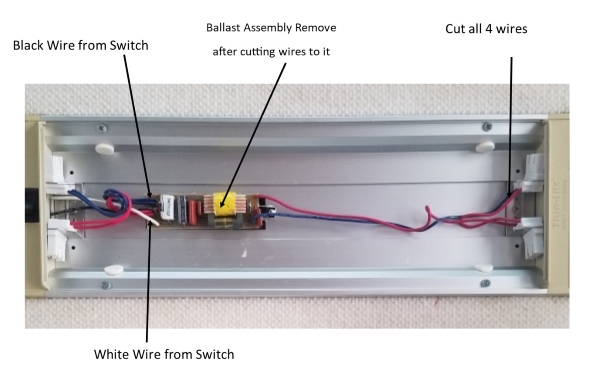
OK - now we have to pay attention!! As discussed above, we are just replacing the "bulbs" for a more efficient type. The new types will NOT use the Ballast Assembly nor the wires to and from the tube holders. Once you get that "concept" in your head - the rest is easy!!
So, in the above picture, you cut all the wires attached to the right tube holders - 2 from the ballast assembly and the loop wire from 1 holder to the other.
Carefully examine the switch side of the fixture. It will have similar wiring going from the ballast to the 2 tube holders, as well as "extra" wires coming from the switch itself. Since we are going to be removing the ballast in the next step, you want to also cut all the wires from the ballast to the tube holders. If your not 100% sure of what wires are what, you can/should cut ALL wires that are attached to the left side of the ballast - right at the ballast area. When you do this, you'll notice the 4 wires coming from the tube holders and the 2 wires from the switch - total of 6.
DO NOT REMOVE the Switch Wires. They were cut at the ballast itself. Just as you did on the right side, cut and remove the tube holder wires right at the tube holders.
The Ballast Assembly can now be removed out of your way, so you can install the new LED lights in replacement. I just used a flat head screw driver to pry it off the rivets on each end.
When that is removed, you are now ready to wire-up the new lights and shouldn't have any of the old Ballast wires anywhere. You will still have the 2 wires from the on/off switch though - a white and a black wire.
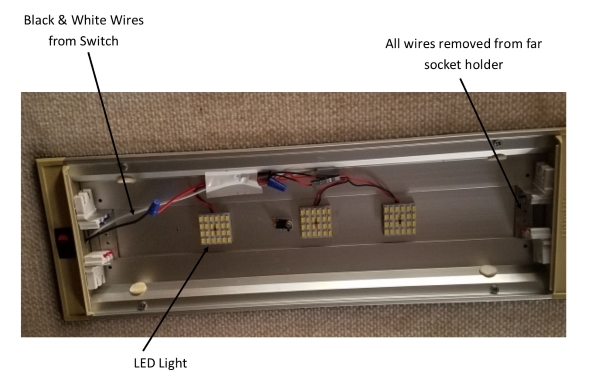
So, all you want to do is color match your wires from the switch to the LED lights. Depending on the type of intensity and sizing and the amount of actual light you want for that particular light placement, will determine how many LED "fixtures" you install.
On the above light, we found that 2 just wasn't quite enough, we needed 3. On other ones, we found that 2 LED fixtures were sufficient.
The LED fixtures will have 2 wires coming off the fixture. Their attaching ends may be plain or have a plug that you may be able to use?
The GOAL is to attach whatever number of LED fixtures you have with a consistent color coding. So, on the above I have each red wire of the 3 LED's attached to all the red wires. All the black wires are attached to the black wires of each LED.
Then, you attach the red wires to one of the switch wires - either black or white. Then you attach all the Black LED wires to the opposite switch wire. Since you can barely see the switch icon to know technically if it is "on" or "off", we didn't care which wire did which. Once the fixture is back installed, you just push the toggle the opposite way to make the light come on or off!!!
The fixture is now ready to be tested before it is installed. Just touch the 2 switch wires to the corresponding color wires coming out of the ceiling. If it doesn't light up, turn the switch to the opposite toggle and it should.
Be sure all the wires coming out of the ceiling are attached to each other!! If you have 2 or more fixtures removed from the ceiling, be sure those wires from each "open" fixture hole in the ceiling are all touching. I panicked when one of the fixtures in the bathroom wouldn't work when I did the switch to LED. Turns out the fixture wires in the commode room were not touching each other and were necessary to provide continuous power to the other fixture in the bathroom!!! So, perhaps only remove 1 fixture at a time!?!?
If all good and it lights up, reinstall the fixture to the ceiling and you are all done!!! In my particular ceilings and cabinet bottoms, the fixture and the large wire-nuts could go on top of the fixture itself. I did not have to stuff the wiring and wire-nuts back into the hole in the ceiling. The fixture fit fine.
Congratulations, job well done!!!
